Payment
A payment operation sends an amount in a specific asset (XLM or non-XLM) to a destination account. With a basic payment operation, the asset sent is the same as the asset received. BasicPay also allows for path payments (where the asset sent is different than the asset received), which we’ll talk about in the next section.
User experience
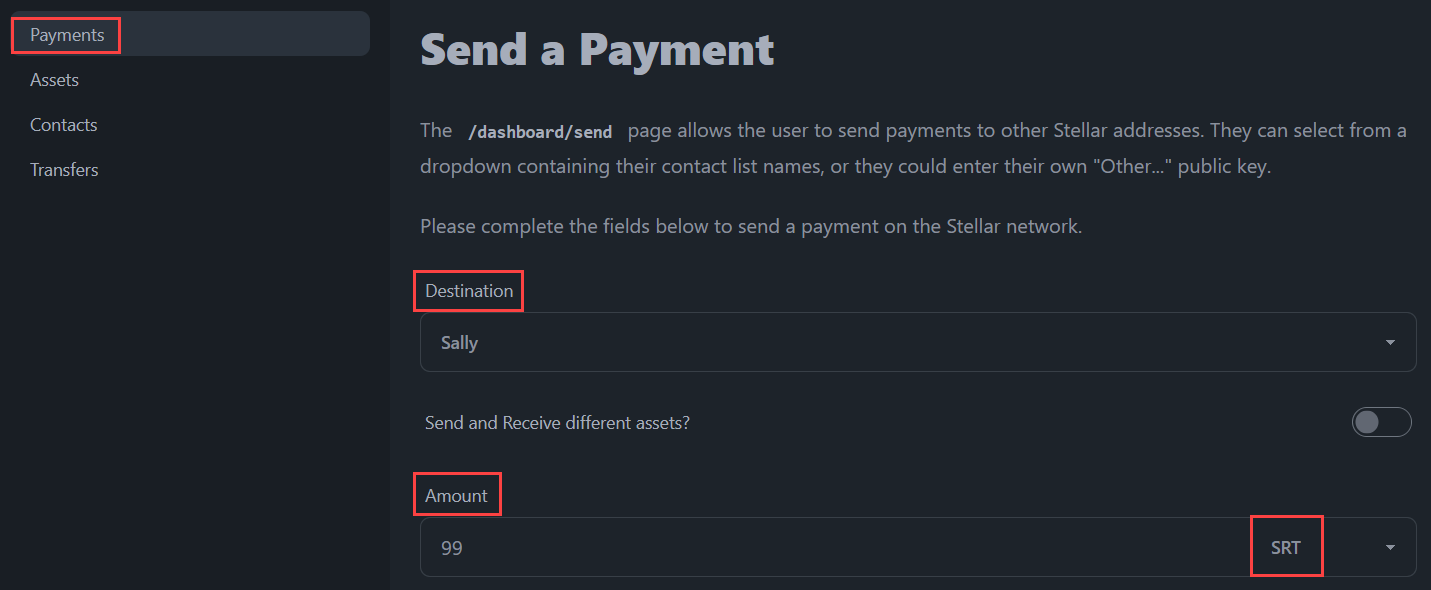
In our BasicPay application, the user will navigate to the Payments page where can either select a user from their contacts or input the public key of a destination address with a specified asset they’d like to send along with the amount of the asset.
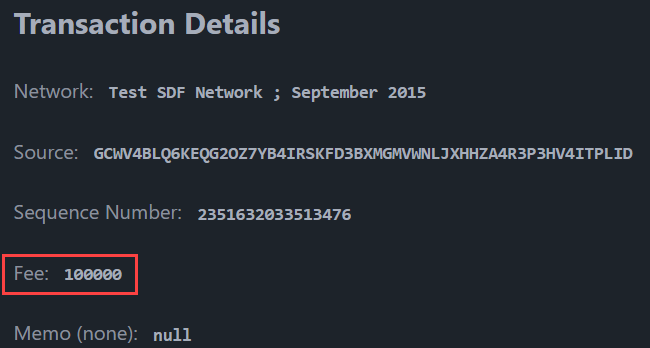
The user clicks the "Confirm Transaction" button. If the destination account exists and is properly funded with XLM, this will trigger a Transaction Preview where they can view the transaction details.
All Stellar transactions require a small fee to make it to the ledger. Read more in our Fees section.
In BasicPay, we’ve set it up so that the user always pays a static fee of 100,000 stroops (one stroop equals 0.0000001 XLM) per operation. Alternatively, you can add a feature to your application that allows the user to set their own fee.
The user then inputs their pincode and clicks the "Confirm" button, which signs and submits the transaction to the ledger.
Code implementation
The /dashboard/send page
The /dashboard/send page allows the user to send payments to other Stellar addresses. They can select from a dropdown containing their contact list names, or they can enter their own "Other..." public key.
The following additional features have been implemented:
- If the destination address is not a funded account, the user is informed they will be using a
createAccountoperation, and must send at least 1 XLM to fund the account. - The user can select to send/receive different assets and paths are queried from Horizon depending on the four below points:
- If they want to strict send or strict receive,
- The source/destination assets they have selected,
- The source/destination accounts, and
- The amount entered for the send/receive value.
- An optional memo field is available for text-only memos.
For now, we'll focus on regular payments, and we'll dig into the path payments in a later section.
<script>
  /**
   * All functionality surrounding path payments has been omitted here. While it
   * is contained in the same file in the source repo, in this tutorial page, we
   * are stripping that out and will include it in a later section.
   */

  // `export let data` allows us to pull in any parent load data for use here.
  /** @type {import('./$types').PageData} */
  export let data;

  // We import any Svelte components we will need
  import ConfirmationModal from "$lib/components/ConfirmationModal.svelte";
  import InfoAlert from "$lib/components/InfoAlert.svelte";

  // We import any stores we will need to read and/or write
  import { infoMessage } from "$lib/stores/alertsStore";
  import { contacts } from "$lib/stores/contactsStore";
  import { walletStore } from "$lib/stores/walletStore";

  // We import some of our `$lib` functions
  import {
    fetchAccount,
    submit,
    fetchAccountBalances,
  } from "$lib/stellar/horizonQueries";
  import {
    createCreateAccountTransaction,
    createPaymentTransaction,
  } from "$lib/stellar/transactions";

  // The `open` Svelte context is used to open the confirmation modal
  import { getContext } from "svelte";
  const { open } = getContext("simple-modal");

  // Define some component variables that will be used throughout the page
  let destination = "";
  $: otherDestination = destination === "other";
  let otherPublicKey = "";
  let sendAsset = "native";
  let sendAmount = "";
  let receiveAsset = "";
  let receiveAmount = "";
  let memo = "";
  let createAccount = null;
  let paymentXDR = "";
  let paymentNetwork = "";

  // Check whether or not the account exists and is funded on the Stellar network.
  let checkDestination = async (publicKey) => {
    // Only do this if the `publicKey` is not "other". This check lets us
    // use the same function for both the select dropdown, and the
    // `otherPublicKey` input element.
    if (publicKey !== "other") {
      try {
        // If the account returns successfully, ensure we're not using a
        // `createAccount` operation
        await fetchAccount(publicKey);
        createAccount = false;
      } catch (err) {
        // Otherwise, inform the user about what will take place
        // @ts-ignore
        if (err.status === 404) {
          createAccount = true;
          sendAsset = "native";
          infoMessage.set(
            "Account Not Funded: You are sending a payment to an account that does not yet exist on the Stellar ledger. Your payment will take the form of a <code>creatAccount</code> operation, and the amount you send must be at least 1 XLM.",
          );
        }
      }
    }
  };

  // Takes an action after the pincode has been confirmed by the user.
  const onConfirm = async (pincode) => {
    // Use the walletStore to sign the transaction
    let signedTransaction = await walletStore.sign({
      transactionXDR: paymentXDR,
      network: paymentNetwork,
      pincode: pincode,
    });
    // Submit the transaction to the Stellar network
    await submit(signedTransaction);
  };

  // Create a payment transaction depending on user selections, and present it
  // to the user for approval or rejection.
  const previewPaymentTransaction = async () => {
    let { transaction, network_passphrase } = createAccount
      ? await createCreateAccountTransaction({
          source: data.publicKey,
          destination: otherDestination ? otherPublicKey : destination,
          amount: sendAmount,
          memo: memo,
        })
      : await createPaymentTransaction({
          source: data.publicKey,
          destination: otherDestination ? otherPublicKey : destination,
          asset: sendAsset,
          amount: sendAmount,
          memo: memo,
        });

    // Set the component variables to hold the transaction details
    paymentXDR = transaction;
    paymentNetwork = network_passphrase;

    // Open the confirmation modal for the user to confirm or reject the
    // transaction. We provide our customized `onConfirm` function, but we
    // have no need to customize and pass an `onReject` function.
    open(ConfirmationModal, {
      transactionXDR: paymentXDR,
      transactionNetwork: paymentNetwork,
      onConfirm: onConfirm,
    });
  };
</script>

<!-- HTML has been omitted from this tutorial. Please check the source file -->
Source: https://github.com/stellar/basic-payment-app/blob/main/src/routes/dashboard/send/+page.svelte
The transaction functions
In the above section, we used the createPaymentTransaction function. This function can be used to send a payment of any asset from one Stellar address to another.
We also used the createCreateAccountTransaction function. This is used when the destination account is not currently funded and active on the Stellar network. The only asset possible in this scenario is native XLM.
import {
  TransactionBuilder,
  Networks,
  Operation,
  Asset,
  Memo,
} from "@stellar/stellar-sdk";
import { Server } from "@stellar/stellar-sdk/rpc";
import { error } from "@sveltejs/kit";

// We are setting a very high maximum fee, which increases our transaction's
// chance of being included in the ledger. We're making this a `const` so we can
// change it on one place as and when recommendations and/or best practices
// evolve. Current recommended fee is `100_000` stroops.
const maxFeePerOperation = "100000";
const rpcUrl = "https://soroban-testnet.stellar.org";
const networkPassphrase = Networks.TESTNET;
const standardTimebounds = 300; // 5 minutes for the user to review/sign/submit

// Constructs and returns a Stellar transaction that contains a `payment` operaion and an optional memo.
export async function createPaymentTransaction({
  source,
  destination,
  asset,
  amount,
  memo,
}) {
  // First, we setup our transaction by loading the source account from the
  // network, and initializing the TransactionBuilder. This is the first step
  // in constructing all Stellar transactions.
  let server = new Server(rpcUrl);
  let sourceAccount = await server.getAccount(source);
  let transaction = new TransactionBuilder(sourceAccount, {
    networkPassphrase: networkPassphrase,
    fee: maxFeePerOperation,
  });

  let sendAsset;
  if (asset && asset !== "native") {
    sendAsset = new Asset(asset.split(":")[0], asset.split(":")[1]);
  } else {
    sendAsset = Asset.native();
  }

  // If a memo was supplied, add it to the transaction. Here, we have the
  // option of a hash memo because this is common practice by anchor transfers
  if (memo) {
    if (typeof memo === "string") {
      transaction.addMemo(Memo.text(memo));
    } else if (typeof memo === "object") {
      transaction.addMemo(Memo.hash(memo.toString("hex")));
    }
  }

  // Add a single `payment` operation
  transaction.addOperation(
    Operation.payment({
      destination: destination,
      amount: amount.toString(),
      asset: sendAsset,
    }),
  );

  // Before the transaction can be signed, it requires timebounds, and it must
  // be "built"
  let builtTransaction = transaction.setTimeout(standardTimebounds).build();
  return {
    transaction: builtTransaction.toXDR(),
    network_passphrase: networkPassphrase,
  };
}

// Constructs and returns a Stellar transaction that contains a `createAccount` operation and an optional memo.
export async function createCreateAccountTransaction({
  source,
  destination,
  amount,
  memo,
}) {
  // The minimum account balance on the Stellar network is 1 XLM (2 base
  // reserves). We'll check that `amount` meets or exceeds that requirement
  // early, so we can fail quickly.
  if (parseFloat(amount.toString()) < 1) {
    throw error(400, { message: "insufficient starting balance" });
  }

  // First, we setup our transaction by loading the source account from the
  // network, and initializing the TransactionBuilder. This is the first step
  // in constructing all Stellar transactions.
  let server = new Server(rpcUrl);
  let sourceAccount = await server.getAccount(source);
  let transaction = new TransactionBuilder(sourceAccount, {
    networkPassphrase: networkPassphrase,
    fee: maxFeePerOperation,
  });

  // If a memo was supplied, add it to the transaction
  if (memo) {
    transaction.addMemo(Memo.text(memo));
  }

  // Add a single `createAccount` operation
  transaction.addOperation(
    Operation.createAccount({
      destination: destination,
      startingBalance: amount.toString(),
    }),
  );

  // Before the transaction can be signed, it requires timebounds, and it must
  // be "built"
  let builtTransaction = transaction.setTimeout(standardTimebounds).build();
  return {
    transaction: builtTransaction.toXDR(),
    network_passphrase: networkPassphrase,
  };
}