Pago
Una operación de pago envía una cantidad en un activo específico (XLM o no-XLM) a una cuenta de destino. Con una operación de pago básica, el activo enviado es el mismo que el activo recibido. BasicPay también permite pagos por ruta (donde el activo enviado es diferente al activo recibido), de los que hablaremos en la siguiente sección.
Experiencia del usuario
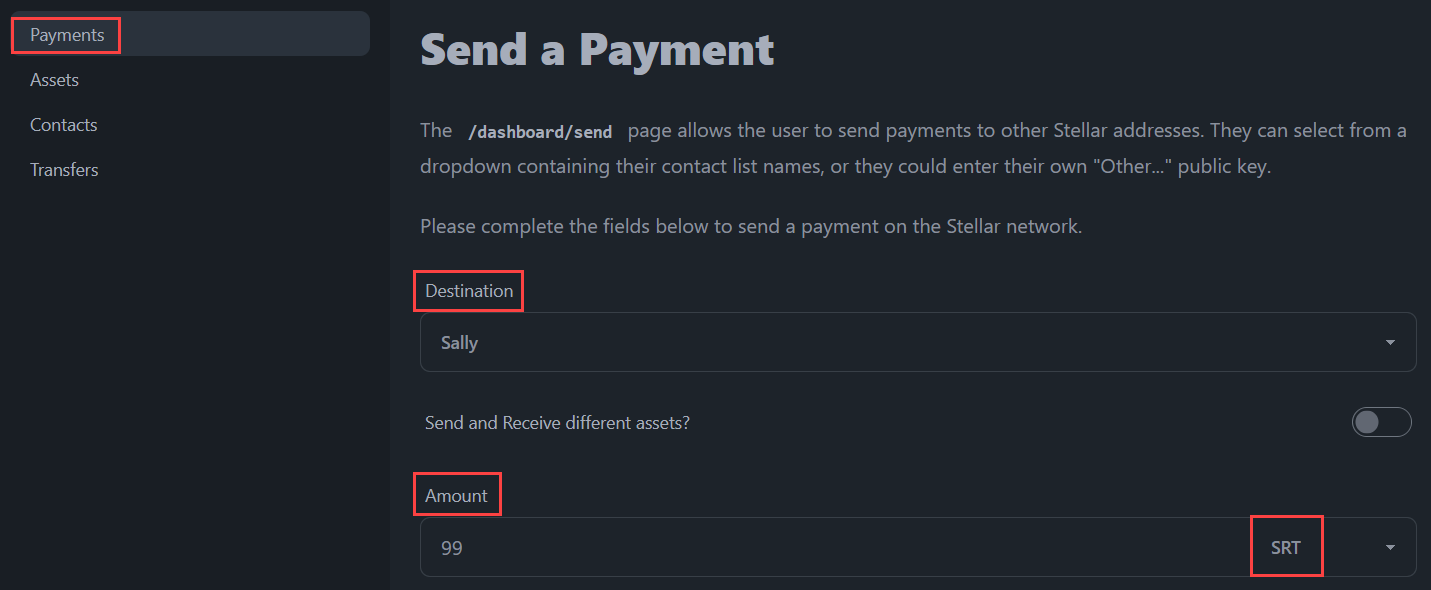
En nuestra aplicación BasicPay, el usuario navegará a la página de Pagos donde podrá seleccionar a un usuario de sus contactos o ingresar la clave pública de una dirección de destino con un activo específico que desea enviar junto con la cantidad del activo.

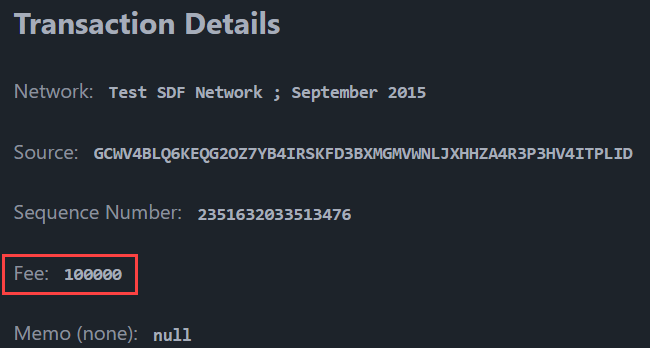
El usuario hace clic en el botón "Confirmar transacción". Si la cuenta de destino existe y está debidamente financiada con XLM, esto desencadenará una Vista previa de la transacción donde podrá ver los detalles de la transacción.
Todas las transacciones Stellar requieren una pequeña tarifa para llegar al ledger. Lee más en nuestra sección de tarifas.
In BasicPay, we’ve set it up so that the user always pays a static fee of 100,000 stroops (one stroop equals 0.0000001 XLM) per operation. Alternativamente, puedes agregar una función a tu aplicación que permita al usuario establecer su propia tarifa.

The user then inputs their pincode and clicks the "Confirm" button, which signs and submits the transaction to the ledger.
Implementación de código
La página /dashboard/send
La página /dashboard/send permite al usuario enviar pagos a otras direcciones Stellar. Pueden seleccionar de un menú desplegable que contiene los nombres de su lista de contactos, o pueden ingresar su propia clave pública "Otro...".
Se han implementado las siguientes características adicionales:
- Si la dirección de destino no es una cuenta financiada, se informa al usuario que utilizará una operación de
createAccounty debe enviar al menos 1 XLM para financiar la cuenta. - El usuario puede seleccionar enviar/recibir diferentes activos y las rutas se consultan desde Horizon dependiendo de los cuatro puntos siguientes:
- Si desea enviar estrictamente o recibir estrictamente,
- Los activos de origen/destino que ha seleccionado,
- Las cuentas de origen/destino, y
- La cantidad ingresada para el valor de enviar/recibir.
- Un campo de memo opcional está disponible para memos de solo texto.
Por ahora, nos enfocaremos en pagos regulares y profundizaremos en los pagos por ruta en una sección posterior.
<script>
  /**
   * All functionality surrounding path payments has been omitted here. While it
   * is contained in the same file in the source repo, in this tutorial page, we
   * are stripping that out and will include it in a later section.
   */

  // `export let data` allows us to pull in any parent load data for use here.
  /** @type {import('./$types').PageData} */
  export let data;

  // We import any Svelte components we will need
  import ConfirmationModal from "$lib/components/ConfirmationModal.svelte";
  import InfoAlert from "$lib/components/InfoAlert.svelte";

  // We import any stores we will need to read and/or write
  import { infoMessage } from "$lib/stores/alertsStore";
  import { contacts } from "$lib/stores/contactsStore";
  import { walletStore } from "$lib/stores/walletStore";

  // We import some of our `$lib` functions
  import {
    fetchAccount,
    submit,
    fetchAccountBalances,
  } from "$lib/stellar/horizonQueries";
  import {
    createCreateAccountTransaction,
    createPaymentTransaction,
  } from "$lib/stellar/transactions";

  // The `open` Svelte context is used to open the confirmation modal
  import { getContext } from "svelte";
  const { open } = getContext("simple-modal");

  // Define some component variables that will be used throughout the page
  let destination = "";
  $: otherDestination = destination === "other";
  let otherPublicKey = "";
  let sendAsset = "native";
  let sendAmount = "";
  let receiveAsset = "";
  let receiveAmount = "";
  let memo = "";
  let createAccount = null;
  let paymentXDR = "";
  let paymentNetwork = "";

  // Check whether or not the account exists and is funded on the Stellar network.
  let checkDestination = async (publicKey) => {
    // Only do this if the `publicKey` is not "other". This check lets us
    // use the same function for both the select dropdown, and the
    // `otherPublicKey` input element.
    if (publicKey !== "other") {
      try {
        // If the account returns successfully, ensure we're not using a
        // `createAccount` operation
        await fetchAccount(publicKey);
        createAccount = false;
      } catch (err) {
        // Otherwise, inform the user about what will take place
        // @ts-ignore
        if (err.status === 404) {
          createAccount = true;
          sendAsset = "native";
          infoMessage.set(
            "Account Not Funded: You are sending a payment to an account that does not yet exist on the Stellar ledger. Your payment will take the form of a <code>creatAccount</code> operation, and the amount you send must be at least 1 XLM.",
          );
        }
      }
    }
  };

  // Takes an action after the pincode has been confirmed by the user.
  const onConfirm = async (pincode) => {
    // Use the walletStore to sign the transaction
    let signedTransaction = await walletStore.sign({
      transactionXDR: paymentXDR,
      network: paymentNetwork,
      pincode: pincode,
    });
    // Submit the transaction to the Stellar network
    await submit(signedTransaction);
  };

  // Create a payment transaction depending on user selections, and present it
  // to the user for approval or rejection.
  const previewPaymentTransaction = async () => {
    let { transaction, network_passphrase } = createAccount
      ? await createCreateAccountTransaction({
          source: data.publicKey,
          destination: otherDestination ? otherPublicKey : destination,
          amount: sendAmount,
          memo: memo,
        })
      : await createPaymentTransaction({
          source: data.publicKey,
          destination: otherDestination ? otherPublicKey : destination,
          asset: sendAsset,
          amount: sendAmount,
          memo: memo,
        });

    // Set the component variables to hold the transaction details
    paymentXDR = transaction;
    paymentNetwork = network_passphrase;

    // Open the confirmation modal for the user to confirm or reject the
    // transaction. We provide our customized `onConfirm` function, but we
    // have no need to customize and pass an `onReject` function.
    open(ConfirmationModal, {
      transactionXDR: paymentXDR,
      transactionNetwork: paymentNetwork,
      onConfirm: onConfirm,
    });
  };
</script>

<!-- HTML has been omitted from this tutorial. Please check the source file -->
Fuente: https://github.com/stellar/basic-payment-app/blob/main/src/routes/dashboard/send/+page.svelte
Las funciones de transacción
En la sección anterior, utilizamos la función createPaymentTransaction. Esta función se puede utilizar para enviar un pago de cualquier activo de una dirección Stellar a otra.
También utilizamos la función createCreateAccountTransaction. Esto se utiliza cuando la cuenta de destino no está actualmente financiada y activa en la red Stellar. El único activo posible en este escenario es el XLM nativo.
import {
  TransactionBuilder,
  Networks,
  Operation,
  Asset,
  Memo,
} from "@stellar/stellar-sdk";
import { Server } from "@stellar/stellar-sdk/rpc";
import { error } from "@sveltejs/kit";

// We are setting a very high maximum fee, which increases our transaction's
// chance of being included in the ledger. We're making this a `const` so we can
// change it on one place as and when recommendations and/or best practices
// evolve. Current recommended fee is `100_000` stroops.
const maxFeePerOperation = "100000";
const rpcUrl = "https://soroban-testnet.stellar.org";
const networkPassphrase = Networks.TESTNET;
const standardTimebounds = 300; // 5 minutes for the user to review/sign/submit

// Constructs and returns a Stellar transaction that contains a `payment` operaion and an optional memo.
export async function createPaymentTransaction({
  source,
  destination,
  asset,
  amount,
  memo,
}) {
  // First, we setup our transaction by loading the source account from the
  // network, and initializing the TransactionBuilder. This is the first step
  // in constructing all Stellar transactions.
  let server = new Server(rpcUrl);
  let sourceAccount = await server.getAccount(source);
  let transaction = new TransactionBuilder(sourceAccount, {
    networkPassphrase: networkPassphrase,
    fee: maxFeePerOperation,
  });

  let sendAsset;
  if (asset && asset !== "native") {
    sendAsset = new Asset(asset.split(":")[0], asset.split(":")[1]);
  } else {
    sendAsset = Asset.native();
  }

  // If a memo was supplied, add it to the transaction. Here, we have the
  // option of a hash memo because this is common practice by anchor transfers
  if (memo) {
    if (typeof memo === "string") {
      transaction.addMemo(Memo.text(memo));
    } else if (typeof memo === "object") {
      transaction.addMemo(Memo.hash(memo.toString("hex")));
    }
  }

  // Add a single `payment` operation
  transaction.addOperation(
    Operation.payment({
      destination: destination,
      amount: amount.toString(),
      asset: sendAsset,
    }),
  );

  // Before the transaction can be signed, it requires timebounds, and it must
  // be "built"
  let builtTransaction = transaction.setTimeout(standardTimebounds).build();
  return {
    transaction: builtTransaction.toXDR(),
    network_passphrase: networkPassphrase,
  };
}

// Constructs and returns a Stellar transaction that contains a `createAccount` operation and an optional memo.
export async function createCreateAccountTransaction({
  source,
  destination,
  amount,
  memo,
}) {
  // The minimum account balance on the Stellar network is 1 XLM (2 base
  // reserves). We'll check that `amount` meets or exceeds that requirement
  // early, so we can fail quickly.
  if (parseFloat(amount.toString()) < 1) {
    throw error(400, { message: "insufficient starting balance" });
  }

  // First, we setup our transaction by loading the source account from the
  // network, and initializing the TransactionBuilder. This is the first step
  // in constructing all Stellar transactions.
  let server = new Server(rpcUrl);
  let sourceAccount = await server.getAccount(source);
  let transaction = new TransactionBuilder(sourceAccount, {
    networkPassphrase: networkPassphrase,
    fee: maxFeePerOperation,
  });

  // If a memo was supplied, add it to the transaction
  if (memo) {
    transaction.addMemo(Memo.text(memo));
  }

  // Add a single `createAccount` operation
  transaction.addOperation(
    Operation.createAccount({
      destination: destination,
      startingBalance: amount.toString(),
    }),
  );

  // Before the transaction can be signed, it requires timebounds, and it must
  // be "built"
  let builtTransaction = transaction.setTimeout(standardTimebounds).build();
  return {
    transaction: builtTransaction.toXDR(),
    network_passphrase: networkPassphrase,
  };
}