Manage Trust
For an account to hold and trade assets other than XLM, it must establish a trustline with the issuing account of that particular asset. Each trustline increases the account’s base reserve by 0.5 XLM, which means the account will have to hold more XLM in its minimum balance.
User experience
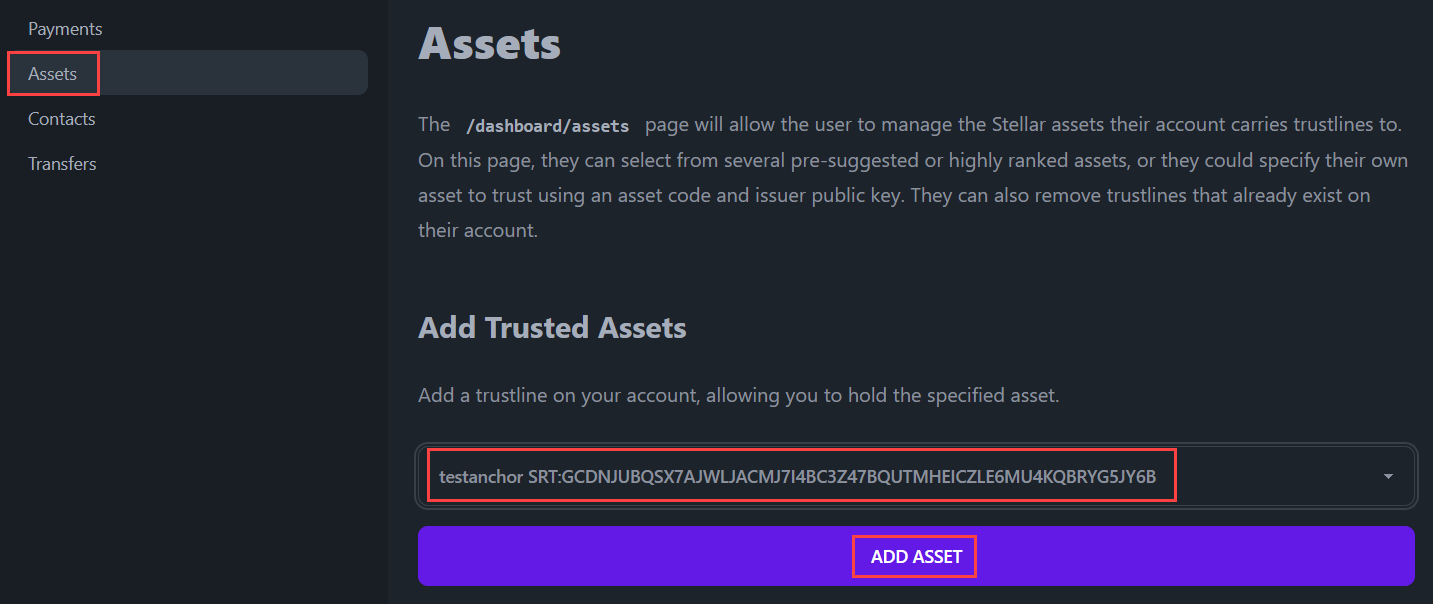
First, we’ll have the user create a trustline for an asset by navigating to the Assets page, selecting an asset, and clicking the “Add Asset” button.
An asset is displayed as an asset code and issuer address. Learn more in our Assets section.
This triggers a modal form for the user to confirm the transaction with their pincode. Once confirmed, a transaction containing the changeTrust operation is signed and submitted to the network, and a trustline is established between the user's account and the issuing account for the asset.
The changeTrust operation can also be used to modify or remove trustlines.
Every transaction must contain a sequence number that is used to identify and verify the order of transactions with the account. A transaction’s sequence number must always increase by one. In BasicPay, fetching and incrementing the sequence number is handled automatically by the transaction builder.
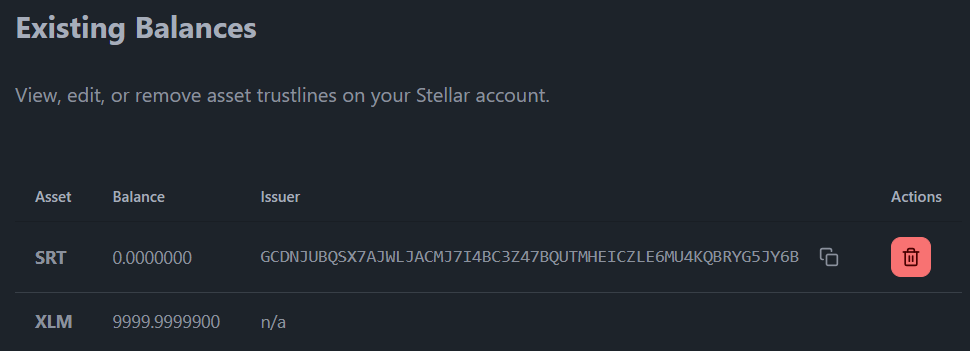
Trustlines hold the balances for all of their associated assets (except XLM, which are held at the account level), and you can display the user’s various balances in your application.
See it in action here: https://basicpay.pages.dev/dashboard/assets
Code implementation
The trustlines an account holds will be necessary to view in several parts of the BasicPay application. First, we'll discuss how we manage different trustlines for the account.
The /dashboard/assets page
The /dashboard/assets page allows the user to manage the Stellar assets their account carries trustlines to. On this page, they can select from several pre-suggested or highly ranked assets, or they could specify their own asset to trust using an asset code and issuer public key. They can also remove trustlines that already exist on their account.
The layout of the page is quite similar to our contacts page. It has a table displaying the existing trustlines and a section where you can add new ones. The key difference is that the contacts store is held in the browser's localStorage, whereas an account's balances are held on the blockchain. So, we will be querying the network to get that information. For more information about how we query this information from the Stellar network, check out the fetchAccountBalances() function in this querying data section.
<script>
  // `export let data` allows us to pull in any parent load data for use here.
  /** @type {import('./$types').PageData} */
  export let data;

  // This is where our _reactive_ array of balances is declared. The query
  // actually takes place in `/src/routes/dashboard/+layout.js`, and is
  // inherited here.
  $: balances = data.balances ?? [];

  // We import things from external packages that will be needed
  import { Trash2Icon } from "svelte-feather-icons";

  // We import any Svelte components we will need
  import ConfirmationModal from "$lib/components/ConfirmationModal.svelte";
  import TruncatedKey from "$lib/components/TruncatedKey.svelte";

  // We import any stores we will need to read and/or write
  import { walletStore } from "$lib/stores/walletStore";
  import { invalidateAll } from "$app/navigation";

  // We import some of our `$lib` functions
  import { createChangeTrustTransaction } from "$lib/stellar/transactions";
  import { fetchAssets } from "$lib/utils/stellarExpert";

  // We import the Server and API types from @stellar/stellar-sdk/rpc for transaction submission
  import { Server, Api } from "@stellar/stellar-sdk/rpc";
  import { xdr } from "@stellar/stellar-sdk";
  import { decode } from "@stellar/stellar-xdr-json";
  import { error } from "@sveltejs/kit";

  // The `open` Svelte context is used to open the confirmation modal
  import { getContext } from "svelte";
  const { open } = getContext("simple-modal");

  // RPC server configuration for transaction submission
  const rpcUrl = "https://soroban-testnet.stellar.org";
  const server = new Server(rpcUrl);

  // Local submit function to send transactions using RPC
  const submit = async (transaction) => {
    try {
      // Send the transaction and get initial response
      const sendTransactionResponse = await server.sendTransaction(transaction);

      // Check if transaction was accepted for processing
      if (sendTransactionResponse.status !== "PENDING") {
        throw new Error(
          `Failed to send transaction, status: ${sendTransactionResponse.status}`,
        );
      }

      // Poll for the final transaction status
      const finalResponse = await server.pollTransaction(
        sendTransactionResponse.hash,
      );

      // Handle the final transaction status
      switch (finalResponse.status) {
        case Api.GetTransactionStatus.FAILED:
          // Include decoded resultXdr for failed transactions
          let errorDetails = `Transaction failed with status: ${finalResponse.status}`;
          if (finalResponse.resultXdr) {
            errorDetails += `\nResult XDR: ${finalResponse.resultXdr.toXDR("base64")}`;
          }
          throw new Error(errorDetails);
        case Api.GetTransactionStatus.NOT_FOUND:
          throw new Error(
            `Transaction was not included in the ledger. Status: ${finalResponse.status}`,
          );
        case Api.GetTransactionStatus.SUCCESS:
          return finalResponse;
        default:
          throw new Error(
            `Unexpected transaction status: ${finalResponse.status}`,
          );
      }
    } catch (err) {
      throw error(400, {
        message: err.message || `Transaction failed: ${err}`,
      });
    }
  };

  // Define some component variables that will be used throughout the page
  let addAsset = "";
  let customAssetCode = "";
  let customAssetIssuer = "";
  let changeTrustXDR = "";
  let changeTrustNetwork = "";
  $: asset =
    addAsset !== "custom"
      ? addAsset
      : `${customAssetCode}:${customAssetIssuer}`;

  // Takes an action after the pincode has been confirmed by the user.
  const onConfirm = async (pincode) => {
    // Use the walletStore to sign the transaction
    let signedTransaction = await walletStore.sign({
      transactionXDR: changeTrustXDR,
      network: changeTrustNetwork,
      pincode: pincode,
    });
    // Submit the transaction to the Stellar network
    await submit(signedTransaction);
    // `invalidateAll` will tell SvelteKit that it should re-run any `load`
    // functions. Since we have a new (or newly deleted) trustline, this
    // results in re-querying the network to get updated account balances.
    invalidateAll();
  };

  // Builds and presents to the user for confirmation a Stellar transaction that
  // will add/modify/remove a trustline on their account. This function is
  // called when the user clicks the "add" or "delete" trustline buttons.
  const previewChangeTrustTransaction = async (
    addingAsset = true,
    removeAsset = undefined,
  ) => {
    // Generate the transaction, expecting back the XDR string
    let { transaction, network_passphrase } =
      await createChangeTrustTransaction({
        source: data.publicKey,
        asset: removeAsset ?? asset,
        limit: addingAsset ? undefined : "0",
      });

    // Set the component variables to hold the transaction details
    changeTrustXDR = transaction;
    changeTrustNetwork = network_passphrase;

    // Open the confirmation modal for the user to confirm or reject the
    // transaction. We provide our customized `onConfirm` function, but we
    // have no need to customize and pass an `onReject` function.
    open(ConfirmationModal, {
      transactionXDR: changeTrustXDR,
      transactionNetwork: changeTrustNetwork,
      onConfirm: onConfirm,
    });
  };
</script>

<!-- HTML has been omitted from this tutorial. Please check the source file -->
Source: https://github.com/stellar/basic-payment-app/blob/main/src/routes/dashboard/assets/+page.svelte
The createChangeTrustTransaction function
In the above page, we've made use of the createChangeTrustTransaction function. This function can be used to add, delete, or modify trustlines on a Stellar account.
import {
  TransactionBuilder,
  Networks,
  Operation,
  Asset,
} from "@stellar/stellar-sdk";
import { Server } from "@stellar/stellar-sdk/rpc";
import { error } from "@sveltejs/kit";

// We are setting a very high maximum fee, which increases our transaction's
// chance of being included in the ledger. We're making this a `const` so we can
// change it on one place as and when recommendations and/or best practices
// evolve. Current recommended fee is `100_000` stroops.
const maxFeePerOperation = "100000";
const rpcUrl = "https://soroban-testnet.stellar.org";
const networkPassphrase = Networks.TESTNET;
const standardTimebounds = 300; // 5 minutes for the user to review/sign/submit

// Constructs and returns a Stellar transaction that will create or modify a
// trustline on an account.
export async function createChangeTrustTransaction({ source, asset, limit }) {
  // We start by converting the asset provided in string format into a Stellar
  // Asset() object
  let trustAsset = new Asset(asset.split(":")[0], asset.split(":")[1]);

  // Next, we setup our transaction by loading the source account from the
  // network using RPC, and initializing the TransactionBuilder.
  let server = new Server(rpcUrl);
  let sourceAccount = await server.getAccount(source);

  // Chaning everything together from the `transaction` declaration means we
  // don't have to assign anything to `builtTransaction` later on. Either
  // method will have the same results.
  let transaction = new TransactionBuilder(sourceAccount, {
    networkPassphrase: networkPassphrase,
    fee: maxFeePerOperation,
  })
    // Add a single `changeTrust` operation (this controls whether we are
    // adding, removing, or modifying the account's trustline)
    .addOperation(
      Operation.changeTrust({
        asset: trustAsset,
        limit: limit?.toString(),
      }),
    )
    // Before the transaction can be signed, it requires timebounds
    .setTimeout(standardTimebounds)
    // It also must be "built"
    .build();

  return {
    transaction: transaction.toXDR(),
    network_passphrase: networkPassphrase,
  };
}