Gestionar Confianza
Para que una cuenta mantenga y negocie activos distintos de XLM, debe establecer una trustline con la cuenta emisora de ese activo en particular. Each trustline increases the account’s base reserve by 0.5 XLM, which means the account will have to hold more XLM in its minimum balance.
Experiencia del usuario
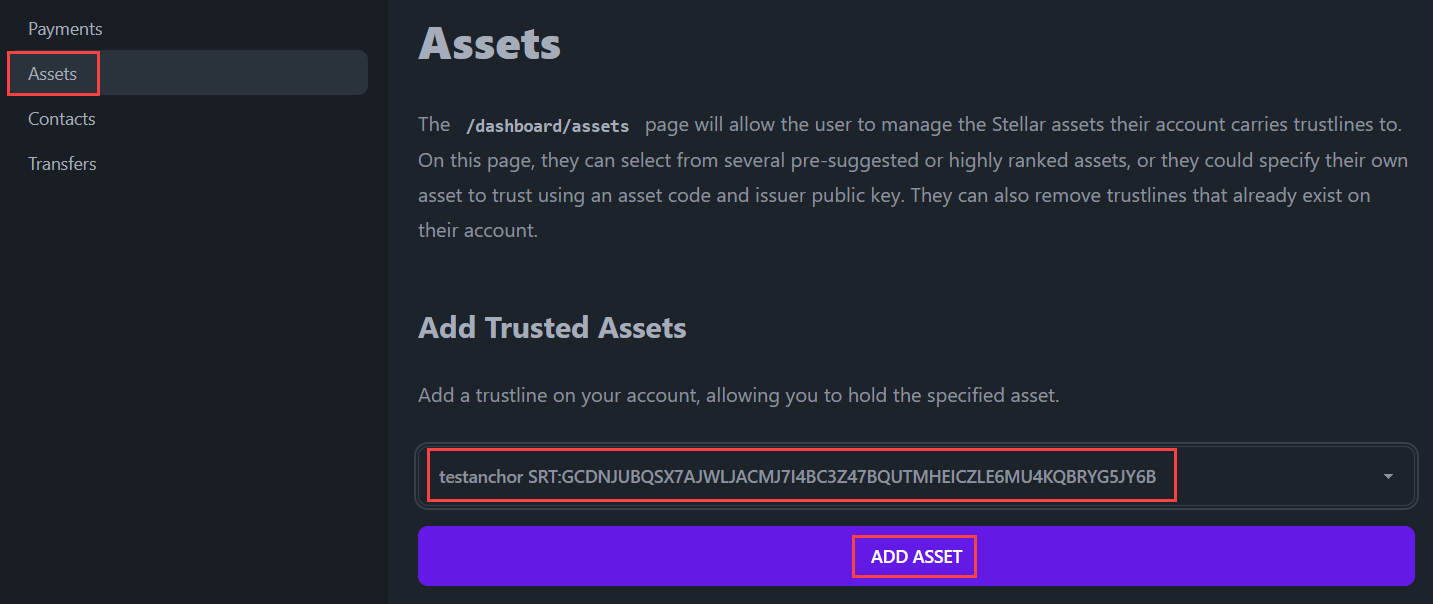
Primero, haremos que el usuario cree una trustline para un activo navegando a la página de Activos, seleccionando un activo y haciendo clic en el botón “Añadir Activo”.
Un activo se muestra como un código de activo y la dirección del emisor. Aprende más en nuestra sección de Activos.

This triggers a modal form for the user to confirm the transaction with their pincode. Una vez confirmado, se firma una transacción que contiene la operación changeTrust y se envía a la red, y se establece una trustline entre la cuenta del usuario y la cuenta emisora para el activo.
La operación changeTrust también se puede utilizar para modificar o eliminar trustlines.
Cada transacción debe contener un número de secuencia que se utiliza para identificar y verificar el orden de las transacciones con la cuenta. El número de secuencia de una transacción debe aumentar siempre en uno. En BasicPay, la obtención e incremento del número de secuencia se manejan automáticamente por el generador de transacciones.
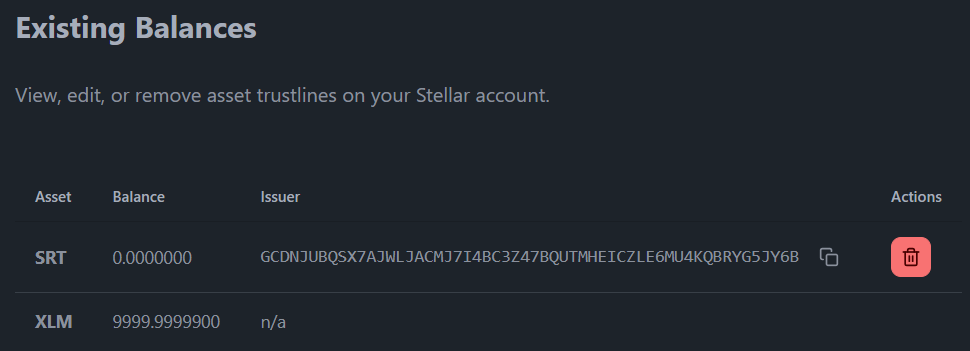
Las trustlines mantienen los saldos de todos sus activos asociados (excepto XLM, que se mantienen a nivel de cuenta), y puedes mostrar los diversos saldos del usuario en tu aplicación.

Velo en acción aquí: https://basicpay.pages.dev/dashboard/assets
Implementación de código
Las trustlines que una cuenta mantiene serán necesarias para visualizarse en varias partes de la aplicación BasicPay. Primero, discutiremos cómo gestionamos diferentes trustlines para la cuenta.
La página /dashboard/assets
La página /dashboard/assets permite al usuario gestionar los activos Stellar a los que su cuenta tiene trustlines. En esta página, pueden elegir entre varias opciones de activos pre-sugeridos o altamente valorados, o pueden especificar su propio activo para confiar utilizando un código de activo y una clave pública del emisor. También pueden eliminar trustlines que ya existen en su cuenta.
El diseño de la página es bastante similar a nuestra página de contactos. Tiene una tabla que muestra las trustlines existentes y una sección donde puedes añadir nuevas. La diferencia clave es que el almacenamiento de contacts se mantiene en localStorage del navegador, mientras que los saldos de una cuenta se mantienen en la blockchain. Por lo tanto, consultaremos la red para obtener esa información. Para más información sobre cómo consultamos esta información de la red Stellar, revisa la función fetchAccountBalances() en esta sección de consultas de datos.
<script>
  // `export let data` allows us to pull in any parent load data for use here.
  /** @type {import('./$types').PageData} */
  export let data;

  // This is where our _reactive_ array of balances is declared. The query
  // actually takes place in `/src/routes/dashboard/+layout.js`, and is
  // inherited here.
  $: balances = data.balances ?? [];

  // We import things from external packages that will be needed
  import { Trash2Icon } from "svelte-feather-icons";

  // We import any Svelte components we will need
  import ConfirmationModal from "$lib/components/ConfirmationModal.svelte";
  import TruncatedKey from "$lib/components/TruncatedKey.svelte";

  // We import any stores we will need to read and/or write
  import { walletStore } from "$lib/stores/walletStore";
  import { invalidateAll } from "$app/navigation";

  // We import some of our `$lib` functions
  import { createChangeTrustTransaction } from "$lib/stellar/transactions";
  import { fetchAssets } from "$lib/utils/stellarExpert";

  // We import the Server and API types from @stellar/stellar-sdk/rpc for transaction submission
  import { Server, Api } from "@stellar/stellar-sdk/rpc";
  import { xdr } from "@stellar/stellar-sdk";
  import { decode } from "@stellar/stellar-xdr-json";
  import { error } from "@sveltejs/kit";

  // The `open` Svelte context is used to open the confirmation modal
  import { getContext } from "svelte";
  const { open } = getContext("simple-modal");

  // RPC server configuration for transaction submission
  const rpcUrl = "https://soroban-testnet.stellar.org";
  const server = new Server(rpcUrl);

  // Local submit function to send transactions using RPC
  const submit = async (transaction) => {
    try {
      // Send the transaction and get initial response
      const sendTransactionResponse = await server.sendTransaction(transaction);

      // Check if transaction was accepted for processing
      if (sendTransactionResponse.status !== "PENDING") {
        throw new Error(
          `Failed to send transaction, status: ${sendTransactionResponse.status}`,
        );
      }

      // Poll for the final transaction status
      const finalResponse = await server.pollTransaction(
        sendTransactionResponse.hash,
      );

      // Handle the final transaction status
      switch (finalResponse.status) {
        case Api.GetTransactionStatus.FAILED:
          // Include decoded resultXdr for failed transactions
          let errorDetails = `Transaction failed with status: ${finalResponse.status}`;
          if (finalResponse.resultXdr) {
            errorDetails += `\nResult XDR: ${finalResponse.resultXdr.toXDR("base64")}`;
          }
          throw new Error(errorDetails);
        case Api.GetTransactionStatus.NOT_FOUND:
          throw new Error(
            `Transaction was not included in the ledger. Status: ${finalResponse.status}`,
          );
        case Api.GetTransactionStatus.SUCCESS:
          return finalResponse;
        default:
          throw new Error(
            `Unexpected transaction status: ${finalResponse.status}`,
          );
      }
    } catch (err) {
      throw error(400, {
        message: err.message || `Transaction failed: ${err}`,
      });
    }
  };

  // Define some component variables that will be used throughout the page
  let addAsset = "";
  let customAssetCode = "";
  let customAssetIssuer = "";
  let changeTrustXDR = "";
  let changeTrustNetwork = "";
  $: asset =
    addAsset !== "custom"
      ? addAsset
      : `${customAssetCode}:${customAssetIssuer}`;

  // Takes an action after the pincode has been confirmed by the user.
  const onConfirm = async (pincode) => {
    // Use the walletStore to sign the transaction
    let signedTransaction = await walletStore.sign({
      transactionXDR: changeTrustXDR,
      network: changeTrustNetwork,
      pincode: pincode,
    });
    // Submit the transaction to the Stellar network
    await submit(signedTransaction);
    // `invalidateAll` will tell SvelteKit that it should re-run any `load`
    // functions. Since we have a new (or newly deleted) trustline, this
    // results in re-querying the network to get updated account balances.
    invalidateAll();
  };

  // Builds and presents to the user for confirmation a Stellar transaction that
  // will add/modify/remove a trustline on their account. This function is
  // called when the user clicks the "add" or "delete" trustline buttons.
  const previewChangeTrustTransaction = async (
    addingAsset = true,
    removeAsset = undefined,
  ) => {
    // Generate the transaction, expecting back the XDR string
    let { transaction, network_passphrase } =
      await createChangeTrustTransaction({
        source: data.publicKey,
        asset: removeAsset ?? asset,
        limit: addingAsset ? undefined : "0",
      });

    // Set the component variables to hold the transaction details
    changeTrustXDR = transaction;
    changeTrustNetwork = network_passphrase;

    // Open the confirmation modal for the user to confirm or reject the
    // transaction. We provide our customized `onConfirm` function, but we
    // have no need to customize and pass an `onReject` function.
    open(ConfirmationModal, {
      transactionXDR: changeTrustXDR,
      transactionNetwork: changeTrustNetwork,
      onConfirm: onConfirm,
    });
  };
</script>

<!-- HTML has been omitted from this tutorial. Please check the source file -->
Fuente: https://github.com/stellar/basic-payment-app/blob/main/src/routes/dashboard/assets/+page.svelte
La función createChangeTrustTransaction
En la página anterior, hemos hecho uso de la función createChangeTrustTransaction. Esta función se puede usar para añadir, eliminar o modificar trustlines en una cuenta Stellar.
import {
  TransactionBuilder,
  Networks,
  Operation,
  Asset,
} from "@stellar/stellar-sdk";
import { Server } from "@stellar/stellar-sdk/rpc";
import { error } from "@sveltejs/kit";

// We are setting a very high maximum fee, which increases our transaction's
// chance of being included in the ledger. We're making this a `const` so we can
// change it on one place as and when recommendations and/or best practices
// evolve. Current recommended fee is `100_000` stroops.
const maxFeePerOperation = "100000";
const rpcUrl = "https://soroban-testnet.stellar.org";
const networkPassphrase = Networks.TESTNET;
const standardTimebounds = 300; // 5 minutes for the user to review/sign/submit

// Constructs and returns a Stellar transaction that will create or modify a
// trustline on an account.
export async function createChangeTrustTransaction({ source, asset, limit }) {
  // We start by converting the asset provided in string format into a Stellar
  // Asset() object
  let trustAsset = new Asset(asset.split(":")[0], asset.split(":")[1]);

  // Next, we setup our transaction by loading the source account from the
  // network using RPC, and initializing the TransactionBuilder.
  let server = new Server(rpcUrl);
  let sourceAccount = await server.getAccount(source);

  // Chaning everything together from the `transaction` declaration means we
  // don't have to assign anything to `builtTransaction` later on. Either
  // method will have the same results.
  let transaction = new TransactionBuilder(sourceAccount, {
    networkPassphrase: networkPassphrase,
    fee: maxFeePerOperation,
  })
    // Add a single `changeTrust` operation (this controls whether we are
    // adding, removing, or modifying the account's trustline)
    .addOperation(
      Operation.changeTrust({
        asset: trustAsset,
        limit: limit?.toString(),
      }),
    )
    // Before the transaction can be signed, it requires timebounds
    .setTimeout(standardTimebounds)
    // It also must be "built"
    .build();

  return {
    transaction: transaction.toXDR(),
    network_passphrase: networkPassphrase,
  };
}