SEP-10: Stellar Web Authentication
Similar to the SEP-1 information, both SEP-6 and SEP-24 protocols make use of SEP-10 for authentication with the user. The user must prove they own the account before they can withdraw or deposit any assets as part of SEP-10: Stellar Web Authentication.
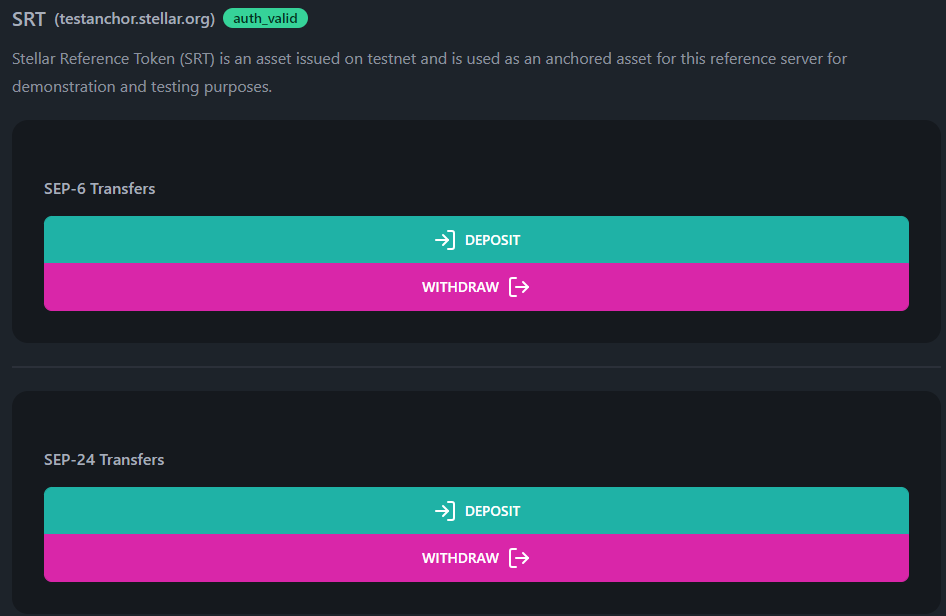
Since we have the stellar.toml file information already, we can use that to display some interactive elements to the user.
Prompt for authentication
The /src/routes/dashboard/transfers/+page.svelte is doing a lot of work throughout these sections, and we are chopping it up in various ways for display as part of this tutorial. For a full picture of this file, please remember to check the source code.
<script>
  // `export let data` allows us to pull in any parent load data for use here.
  /** @type {import('./$types').PageData} */
  export let data;

  // We import some of our `$lib` functions
  import { fetchStellarToml } from "$lib/stellar/sep1";

  // An object to easily and consistently class badges based on the status of
  // a user's authentication token for a given anchor.
  const authStatusClasses = {
    unauthenticated: "badge badge-error",
    auth_expired: "badge badge-warning",
    auth_valid: "badge badge-success",
  };

  // A simple function that checks whether a user has a SEP-10 authentication token stored for an anchor, and if it is expired or not.
  const getAuthStatus = (homeDomain) => {
    if ($webAuthStore[homeDomain]) {
      let token = $webAuthStore[homeDomain];
      if (webAuthStore.isTokenExpired(token)) {
        return "auth_expired";
      } else {
        return "auth_valid";
      }
    } else {
      return "unauthenticated";
    }
  };
</script>

<!-- HTML has been omitted from this tutorial. Please check the source file -->
Source: https://github.com/stellar/basic-payment-app/blob/main/src/routes/dashboard/transfers/+page.svelte
Requesting a challenge transaction
Now, when the user clicks the "authenticate" button, it triggers the auth function.

<script>
  /* This <script> tag has been abbreviated for simplicity */

  import { getChallengeTransaction } from "$lib/stellar/sep10";

  // We import any Svelte components we will need
  import ConfirmationModal from "$lib/components/ConfirmationModal.svelte";

  // The `open` Svelte context is used to open the confirmation modal
  import { getContext } from "svelte";
  const { open } = getContext("simple-modal");

  // Define some component variables that will be used throughout the page
  let challengeXDR = "";
  let challengeNetwork = "";
  let challengeHomeDomain = "";

  // Requests a challenge transaction from a SEP-10 server, and presents it to the user for pincode verification
  const auth = async (homeDomain) => {
    // Request the challenge transaction, expecting back the XDR string
    let { transaction, network_passphrase } = await getChallengeTransaction({
      publicKey: data.publicKey,
      homeDomain: homeDomain,
    });

    // Set the component variables to hold the transaction details
    challengeXDR = transaction;
    challengeNetwork = network_passphrase;
    challengeHomeDomain = homeDomain;

    // Open the confirmation modal for the user to confirm or reject the
    // challenge transaction. We provide our customized `onAuthConfirm`
    // function to be called as part of the modal's confirming process.
    open(ConfirmationModal, {
      title: "SEP-10 Challenge Transaction",
      body: "Please confirm your ownership of this account by signing this challenge transaction. This transaction has already been checked and verified and everything looks good from what we can tell. Feel free to double-check that everything lines up with the SEP-10 specification yourself, though.",
      transactionXDR: challengeXDR,
      transactionNetwork: challengeNetwork,
      onConfirm: onAuthConfirm,
    });
  };

  /* ... */
</script>

<!-- HTML has been omitted from this tutorial. Please check the source file -->
Source: https://github.com/stellar/basic-payment-app/blob/main/src/routes/dashboard/transfers/+page.svelte
As part of the auth function, BasicPay makes a GET request with an account param (the public key of the user) to the anchor, which sends back a Stellar transaction signed by the server's signing key (called a challenge transaction) with an invalid sequence number so it couldn't actually do anything if it were accidentally submitted to the network.
import { WebAuth } from "@stellar/stellar-sdk";
import { fetchStellarToml } from "$lib/stellar/sep1";

// Requests, validates, and returns a SEP-10 challenge transaction from an anchor server.
export async function getChallengeTransaction({ publicKey, homeDomain }) {
  let { WEB_AUTH_ENDPOINT, TRANSFER_SERVER, SIGNING_KEY } =
    await fetchStellarToml(homeDomain);

  // In order for the SEP-10 flow to work, we must have at least a server
  // signing key, and a web auth endpoint (which can be the transfer server as
  // a fallback)
  if (!(WEB_AUTH_ENDPOINT || TRANSFER_SERVER) || !SIGNING_KEY) {
    throw error(500, {
      message:
        "could not get challenge transaction (server missing toml entry or entries)",
    });
  }

  // Request a challenge transaction for the users's account
  let res = await fetch(
    `${WEB_AUTH_ENDPOINT || TRANSFER_SERVER}?${new URLSearchParams({
      // Possible parameters are `account`, `memo`, `home_domain`, and
      // `client_domain`. For our purposes, we only supply `account`.
      account: publicKey,
    })}`,
  );
  let json = await res.json();

  // Validate the challenge transaction meets all the requirements for SEP-10
  validateChallengeTransaction({
    transactionXDR: json.transaction,
    serverSigningKey: SIGNING_KEY,
    network: json.network_passphrase,
    clientPublicKey: publicKey,
    homeDomain: homeDomain,
  });
  return json;
}

// Validates the correct structure and information in a SEP-10 challenge transaction.
function validateChallengeTransaction({
  transactionXDR,
  serverSigningKey,
  network,
  clientPublicKey,
  homeDomain,
  clientDomain,
}) {
  if (!clientDomain) {
    clientDomain = homeDomain;
  }

  try {
    // Use the `readChallengeTx` function from Stellar SDK to read and
    // verify most of the challenge transaction information
    let results = WebAuth.readChallengeTx(
      transactionXDR,
      serverSigningKey,
      network,
      homeDomain,
      clientDomain,
    );
    // Also make sure the transaction was created for the correct user
    if (results.clientAccountID === clientPublicKey) {
      return;
    } else {
      throw error(400, {
        message: "clientAccountID does not match challenge transaction",
      });
    }
  } catch (err) {
    throw error(400, { message: JSON.stringify(err) });
  }
}
Source: https://github.com/stellar/basic-payment-app/blob/main/src/lib/stellar/sep10.js
Sign and submit the challenge transaction
In response, the user signs the transaction. You may have noticed we present this challenge transaction to the user with our regular confirmation modal. Once they've signed the transaction, the application sends it back to the anchor with a POST request. If the signature checks out, the success response will contain a JSON Web Token (JWT), which BasicPay stores in the webAuthStore store to use for future interactions with the anchor.
<script>
  /* ... */

  // We import any stores we will need to read and/or write
  import { invalidateAll } from "$app/navigation";
  import { walletStore } from "$lib/stores/walletStore";
  import { webAuthStore } from "$lib/stores/webAuthStore";

  // We import some of our `$lib` functions
  import {
    getChallengeTransaction,
    submitChallengeTransaction,
  } from "$lib/stellar/sep10";

  // Takes an action after the pincode has been confirmed by the user on a SEP-10 challenge transaction.
  const onAuthConfirm = async (pincode) => {
    // Sign the transaction with the user's keypair
    let signedTransaction = await walletStore.sign({
      transactionXDR: challengeXDR,
      network: challengeNetwork,
      pincode: pincode,
    });
    // Submit the signed tx to the SEP-10 server, and get the JWT token back
    let token = await submitChallengeTransaction({
      transactionXDR: signedTransaction.toXDR(),
      homeDomain: challengeHomeDomain,
    });
    // Add the token to our store
    webAuthStore.setAuth(challengeHomeDomain, token);
    // Reload any relevant `load()` functions (i.e., refresh the page)
    invalidateAll();
  };

  /* ... */
</script>

<!-- HTML has been omitted from this tutorial. Please check the source file -->
Source: https://github.com/stellar/basic-payment-app/blob/main/src/routes/dashboard/transfers/+page.svelte
The submitChallengeTransaction function is quite simple. We take the transaction (in XDR format) and the domain name, and submit it to the relevant WEB_AUTH_ENDPOINT provided by the home domain's stellar.toml file.
// Submits a SEP-10 challenge transaction to an authentication server and returns the SEP-10 token.
export async function submitChallengeTransaction({
  transactionXDR,
  homeDomain,
}) {
  let webAuthEndpoint = await getWebAuthEndpoint(homeDomain);

  if (!webAuthEndpoint)
    throw error(500, {
      message: "could not authenticate with server (missing toml entry)",
    });
  let res = await fetch(webAuthEndpoint, {
    method: "POST",
    mode: "cors",
    headers: { "Content-Type": "application/json" },
    body: JSON.stringify({ transaction: transactionXDR }),
  });
  let json = await res.json();

  if (!res.ok) {
    throw error(400, { message: json.error });
  }
  return json.token;
}
Source: https://github.com/stellar/basic-payment-app/blob/main/src/lib/stellar/sep10.js
About the webAuthStore store
Like so much of our BasicPay application, the various authentication tokens the user may have accumulated over time are stored in the browser's localStorage. There's not much special about this particular store, but here's how we put it together:
import { get } from "svelte/store";
import { persisted } from "svelte-local-storage-store";
import { Buffer } from "buffer";

function createWebAuthStore() {
  const { subscribe, update } = persisted("bpa:webAuthStore", {});

  return {
    subscribe,

    // Stores a JWT authentication token associated with a home domain server.
    setAuth: (homeDomain, token) =>
      update((store) => {
        return {
          ...store,
          [homeDomain]: token,
        };
      }),

    // Determine whether or not a JSON web token has an expiration date in the future or in the past.
    isTokenExpired: (homeDomain) => {
      let token = get(webAuthStore)[homeDomain];
      if (token) {
        let payload = JSON.parse(
          Buffer.from(token.split(".")[1], "base64").toString(),
        );
        let timestamp = Math.floor(Date.now() / 1000);
        return timestamp > payload.exp;
      } else {
        return undefined;
      }
    },
  };
}

export const webAuthStore = createWebAuthStore();
Source: https://github.com/stellar/basic-payment-app/blob/main/src/lib/stores/webAuthStore.js
Now that we have successfully authenticated our user with an asset anchor, we can display and process the various transfer capabilities of the anchor in question. We'll begin with SEP-6, since that will lay the groundwork for SEP-24 to follow.