Integrate with MoneyGram Access
This document guides the reader through the technical requirements for integrating MoneyGram Access into an existing application. MoneyGram Access is a MoneyGram product that enables users of third-party applications, such as crypto wallets and exchanges, to cash-in (deposit) and cash-out (withdrawal) of Stellar USDC.
MoneyGram requires businesses to go through an onboarding process in order to get access to their testing and production environments. To get started with this process, reach out to [email protected].
Resources
- MoneyGram Access Wallet MVP Implementation
- Use this MVP implementation as a reference for building your own integration. Many of the code snippets shared in this document are pulled from this project.
- Stellar Wallet SDK Docs
- Use this Wallet SDK to facilitate building your own integration. Many of the code snippets shared in this document are pulled from the Stellar Wallet SDK repository.
- Stellar Test Anchor
- Before getting access to MoneyGram's test environment, you can use the SDF's test anchor while developing your integration
- Stellar Demo Wallet
- This application visualizes the API calls necessary to connect to a Stellar Anchor
- Stellar Ecosystem Proposal 24 (SEP-24)
- The standardized API protocol for Stellar on & off ramps, implemented by MoneyGram
- Stellar Ecosystem Proposal 10 (SEP-10)
- The standardized API protocol for Stellar authentication, implemented by MoneyGram
Asset Information
Before you get access to MoneyGram's test environment, you should test your implementation with the SDF's Stellar Test Anchor. It implements the same APIs as MoneyGram's service but uses a different asset. The information for each asset is below.
Stellar Reference Token
This token is only on testnet.
- Issuing Account: GCDNJUBQSX7AJWLJACMJ7I4BC3Z47BQUTMHEICZLE6MU4KQBRYG5JY6B
- Asset Code: SRT
USD Coin
Testnet:
- Issuing Account: GBBD47IF6LWK7P7MDEVSCWR7DPUWV3NY3DTQEVFL4NAT4AQH3ZLLFLA5
- Asset Code: USDC
Pubnet:
- Issuing Account: GA5ZSEJYB37JRC5AVCIA5MOP4RHTM335X2KGX3IHOJAPP5RE34K4KZVN
- Asset Code: USDC
Introduction
Applications seeking to integrate MoneyGram Access must implement the client side of Stellar Ecosystem Proposal 24 (SEP-24), a standardized protocol defined for applications to connect to businesses such as MoneyGram, more generally called anchors, that offer Stellar deposit & withdrawal services utilizing local payment rails.
This document will walk you through the necessary steps to develop a functional implementation of this standard.
The guide will assume your application is first being developed on Stellar’s test network and using MoneyGram’s testing deployment of Access, but there are no functional differences deploying the application to Stellar’s public network and using MoneyGram’s production deployment.
Installing the Wallet SDK
We highly recommend using the wallet SDK to facilitate building your integration. Find more info on the Stellar Wallet SDK Docs.
You can use yarn to install it:
- bash
yarn add @stellar/typescript-wallet-sdk
Custodial vs. Non-Custodial Applications
Some applications, such as centralized exchanges, are custodial, meaning the application has access to the private keys of the acccounts holding its users’ funds on Stellar. Typically, custodial applications pool user funds into a smaller set of managed Stellar accounts, called pooled, shared, or omnibus accounts.
Other applications are non-custodial, meaning the application does not have access to the private keys of the accounts holding its users' funds on Stellar. Typically, non-custodial applications create or import a pre-existing Stellar account for each user.
These two approaches require minor but concrete differences in how applications integrate with MoneyGram Access. The sub-sections below will describe these differences, but the rest of this tutorial will assume the application is custodial.
Authentication
MoneyGram needs to authenticate both the user and the application being used via Stellar's SEP-10 protocol.
Custodial applications are identified by the Stellar account public key they register with MoneyGram during the onboarding process. When authenticating, the application must pass this public key as the account query parameter, and to identify the user, the application must pass a unique integer ID as the memo query parameter. MoneyGram will return a Stellar transaction that must be signed by the application's private key and sent back for verification.
Because each user of a non-custodial application has their own Stellar account, non-custodial applications are identified by the home domain they register with MoneyGram during the onboarding process. When authenticating, the application must pass the user's public key as the account query parameter, and pass their home domain as the client_domain query parameter. MoneyGram will look up the SIGNING_KEY value at https://<client_domain>/.well-known/stellar.toml, and return a Stellar transaction that requires signatures from both the user's private key & the private key of the public SIGNING_KEY on the application's SEP-1 stellar.toml file. An example file can be found at https://vibrantapp.com/.well-known/stellar.toml.
Transaction Initiation
Because users of custodial applications don't have individual Stellar accounts, only the application knows how much money a user has to withdraw. Because of this, MoneyGram requires custodial applications to always pass the amount field in the request to start a new transaction. Non-custodial applications do not need to do this, although they can if they prefer.
Source & Destination of Funds
MoneyGram requires custodial applications to provide the Stellar accounts that may be used as the source or destination of funds during the onboarding process. For non-custodial applications, MoneyGram requires the source and destination of funds for each transaction to be the same account that was authenticated via SEP-10.
Application Flow & Architecture
This guide will assume the application has a basic client-server architecture. The application’s client will request resources and initiate actions with the application’s server, which will communicate directly with MoneyGram’s server.
Below are the 7 high-level steps to take to facilitate a cash-out (withdrawal) transaction.
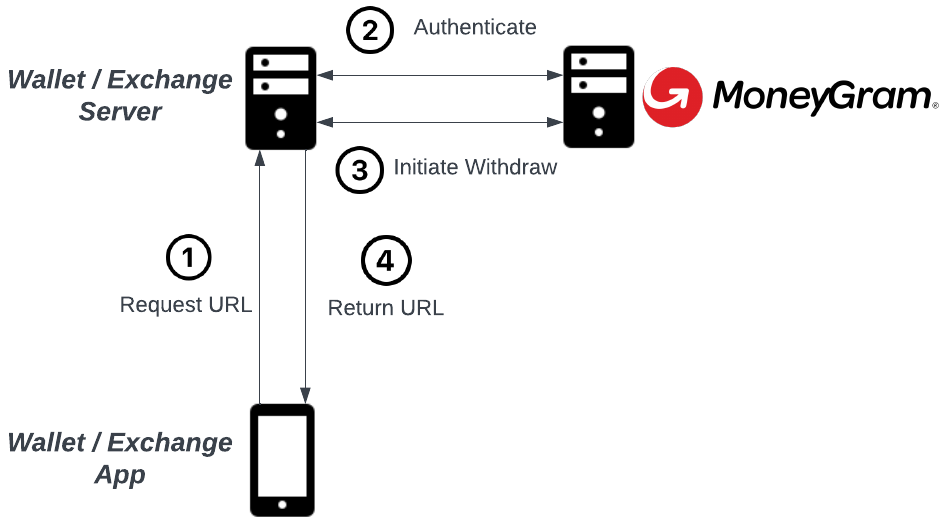
After Step 4, the application should open the URL provided by MoneyGram in a mobile webview or browser tab. MoneyGram will then prompt the user to provide KYC and transaction information. On completion of this flow, the application’s client should close the MoneyGram tab or webview and initiate the disbursement of funds.
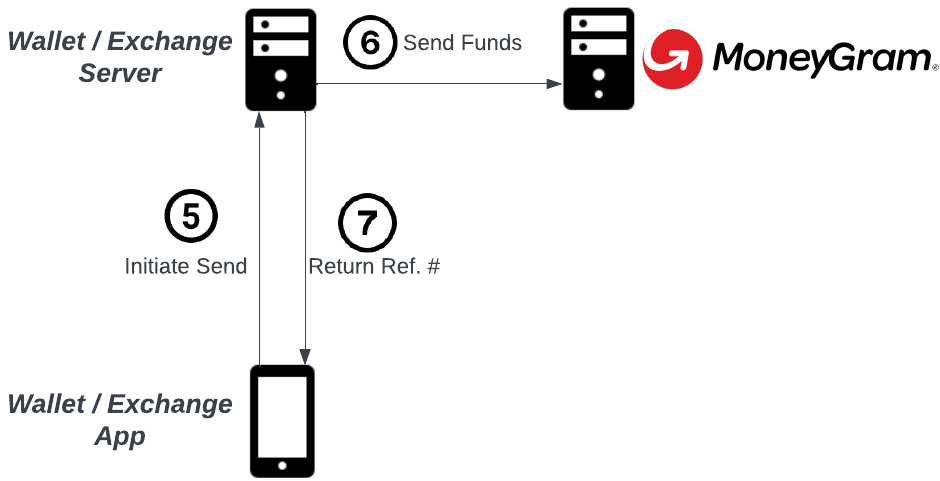
The provided reference number would then be taken to any MoneyGram cash agent in order to receive cash in the user’s fiat currency. These steps document the cash-out, or withdrawal flow. The deposit flow is similar and detailed in the steps below.
Generate Stellar Keypairs
In this section, you will generate at least two Stellar keypairs, one that will be used to prove your application’s identity when authenticating with MoneyGram Access, and another that will hold, send & receive USDC on Stellar. You should always use one keypair for authentication, but application could use many keypairs for sending & receiving payments. In this guide, we'll assume the application uses one keypair for each purpose.
This section assumes that your application does not have any support for the Stellar network. If your application already supports deposits & withdrawals of XLM, you already have one or more Stellar accounts that can be used for these purposes, although it is heavily encouraged to use a new keypair for authentication.
Go to Stellar Lab and generate 2 keypairs. The secret keys should be handled securely, because they will be used to authenticate with and disburse funds to MoneyGram.
The first keypair will be called the “authentication” keypair (or public / secret key). The second keypair will be the “funds” keypair (or account, public key, or secret key). Unlike the authentication keypair, the funds keypair will reference a funded account on the Stellar network. The authentication keypair does not need to funded.
Provide the public keys (starting with a G) of both the authentication and funds keypairs to MoneyGram. They will add these keys to their known lists of keys, granting them access to their deployment.
Get XLM & USDC
Many cryptocurrency exchanges support purchasing XLM or USDC on Stellar. The SDF also maintains an Anchor Directory that attempts to list all the on & off-ramps for the Stellar Network.
When you’ve purchased XLM and / or USDC on an exchange, you can make a payment to an external account, specifically to the funds public key you generated in the previous step. Note that you will first need to send XLM to create the account, then add a USDC trustline, then send the USDC. Creating a trustline to USDC can be done using Stellar Lab or any Stellar-enabled wallet application, such as Lobstr.
Some exchanges support XLM but do not support USDC on Stellar. This is not a problem, because you can always sell XLM for USDC on Stellar’s decentralized exchange (or SDEX).
To do this, send your XLM to the funds public key from the exchange, add a USDC trustline, and sell XLM for USDC using a sell offer.
Authenticate
This section encompasses steps 1 & 2 of the diagram displayed in the Architecture section above. The application’s client should request a MoneyGram transaction URL from the application’s server on user initiation. This should trigger an authentication process between the application’s server and MoneyGram’s server. This process is standardized in SEP-10.
This section assumes that the application’s server has the following pieces of information:
- The user’s integer ID (must be positive and represented using 64 bits or less) MoneyGram’s authentication endpoint
- MoneyGram’s authentication public key
- Testing:
GCUZ6YLL5RQBTYLTTQLPCM73C5XAIUGK2TIMWQH7HPSGWVS2KJ2F3CHS - Production:
GD5NUMEX7LYHXGXCAD4PGW7JDMOUY2DKRGY5XZHJS5IONVHDKCJYGVCL
- Testing:
- The application’s authentication public and secret key
The flow can be described with the following steps:
- The application requests an authentication challenge
- The server (MoneyGram) provides the authentication challenge
- The application verifies that MoneyGram signed the authentication with it's SIGNING_KEY
- The application signs the authentication challenge with its own key
- The application sends the authentication challenge back to the server
- The server verifies the application signed the challenge with the account it initially used to request the challenge
- The server returns a session token for the account & memo used in the initial authentication request
The following code demonstrates how to implement the application’s side of this flow. Note that this code does not handle retries in the event of network connection issues. It also does not handle unexpected status codes, and does not include logging or metrics.
- TypeScript
- Python
import { Wallet, SigningKeypair } from "@stellar/typescript-wallet-sdk";

const wallet = Wallet.TestNet();

// Testnet
const MGI_ACCESS_HOST = "extmgxanchor.moneygram.com";
// Pubnet
// const MGI_ACCESS_HOST = "stellar.moneygram.com";

// First we create an anchor object with MoneyGram's home domain.
const anchor = wallet.anchor({ homeDomain: MGI_ACCESS_HOST });

// Then we create the sep10 object which handles all the athentication steps.
const sep10 = await anchor.sep10();

// Finally, we authenticate using the wallet's SIGNING_KEY secret.
const authKey = SigningKeypair.fromSecret(AUTH_SECRET_KEY);
const authToken = await sep10.authenticate({ accountKp: authKey });
import requests
from stellar_sdk import Network
from stellar_sdk.sep.stellar_web_authentication import read_challenge_transaction

# Testnet
MGI_ACCESS_HOST = "extmgxanchor.moneygram.com"
# Pubnet
# MGI_ACCESS_HOST = "stellar.moneygram.com"

def get_token() -> str:
    query = f"{AUTH_URL}?account={AUTH_PUBLIC_KEY}&memo={USER_ID}"
    response = requests.get(query)
    body = response.json()
    challenge = read_challenge_transaction(
        challenge_transaction=body["transaction"],
        server_account_id=MGI_ACCESS_SIGNING_KEY,
        home_domains=MGI_ACCESS_HOST,
        web_auth_domain=MGI_ACCESS_HOST,
        network_passphrase=Network.TESTNET_NETWORK_PASSPHRASE
    )
    challenge.transaction.sign(AUTH_SECRET_KEY)
    post_body = {
        "transaction": challenge.transaction.to_xdr()
    }
    response = requests.post(f"{AUTH_URL}", json=post_body)
    response_body = response.json()
    return response_body["token"]
Initiate a Transaction
This section encompasses steps 3 & 4 of the architecture diagram displayed above. The application’s server will make a deposit or withdrawal initiation request to MoneyGram’s server, and MoneyGram will return a transaction ID, which will be used later to poll the transaction’s status, and a transaction URL, which should be returned to the application’s client and opened for the user.
For the purpose of this guide, we will go through the withdrawal case.
Note: MoneyGram requires the amount field in requests for both deposit & withdraw transactions if your application is custodial.
You will need the following pieces of information:
- The authentication token provided by MoneyGram. This token can only be used for actions associated with the user identified by the ID used in the previous steps.
- The public key of the keypair the application will use to send funds
- The language code MoneyGram should render their UI’s content with
- The amount the user would like to withdraw / cash-out in case it's a custodial wallet
- This should be collected from the user prior to initiating this transaction
The following code can be used as a reference for implementing this logic yourself.
- TypeScript
- Python
import { IssuedAssetId } from "@stellar/typescript-wallet-sdk";

// First let's make sure Anchor supports the asset we want to withdraw.
const assetCode = "USDC";
const info = await anchor.getInfo();
const currency = info.currencies.find(({ code }) => code === assetCode);
if (!currency?.code || !currency?.issuer) {
  throw new Error(
    `Anchor does not support ${assetCode} asset or is not correctly configured on TOML file`,
  );
}

// Use same "anchor" object from previous step.
const { url, id } = await anchor.sep24().withdraw({
  authToken: authToken, // Use same "authToken" string from previous step
  withdrawalAccount: FUNDS_STELLAR_KEYPAIR.public_key,
  assetCode,
  lang: "en", // "lang" is optional, defaults to "en" if ommited
  extraFields: {
    // "amount" is optional for non-custodial wallets and mandatory for custodial wallets
    amount: "<amount to withdraw / cash-out>",
  },
});
import requests

def initiate_withdraw(token: str, amount: str) -> Tuple[str, str]:
    post_body = {
        "asset_code": ASSET_CODE, # USDC
        "account": FUNDS_STELLAR_KEYPAIR.public_key,
        "lang": "en",
        "amount": amount
    }
    response = requests.post(
        MGI_ACCESS_WITHDRAW_URL,
        json=post_body,
        headers={
            "Authorization": f"Bearer {token}"
        }
    )
    body = response.json()
    return body["url"], body["id"]
The logic for initiating a deposit transaction looks very similar. See the SEP-24 standard specification for detailed information.
Listen for the Close Notification
The next step is to open the provided URL in the application’s client using a mobile webview, browser tab, or popup. The user will then go through KYC if they have not before in a prior transaction. In the deposit case, the user may also select a MoneyGram agent location to go to when providing cash.
Finally, when the user is done with the MoneyGram UI, the user will select a button displayed on MoneyGram’s UI and MoneyGram will send a postMessage to the window or app that opened its flow initially. The message sent will be the SEP-24 transaction JSON object that represents the transaction.
If the transaction received on the postMessage message is on a pending_user_transfer_start status this means the user is done with the MoneyGram UI and it is safe to close the window.
Below is a simple JavaScript example listening for a postMessage notification.
- JavaScript
webview = window.open(moneygramURL, "webview", "width=500,height=800");
window.addEventListener("message", closeWebView);

function closeWebView(e) {
  const txJson = e.data.transaction;
  console.log(`Transaction ${txJson.id} is ${txJson.status}`);

  // If we get a postMessage event and the transaction status is
  // "pending_user_transfer_start" let's interpret that as a signal to close
  // the webview window and take user back to the application experience
  if (txJson.status === "pending_user_transfer_start") {
    webview.close();
  }
}
Send or Receive Funds
In withdrawal (or cash-out) transactions, applications must send USDC to the Stellar account MoneyGram specifies. In deposit (cash-in) transactions, applications must monitor their Stellar account for a payment from MoneyGram.
In each case, the transaction submitted to Stellar must have a memo attached to it. This memo is provided by MoneyGram in the withdrawal case, and provided by the application in the deposit case. The memo is an identifier that allows the parties to tie the on-chain payment to the transaction record in the application’s or MoneyGram’s database.
Poll Until MoneyGram is Ready
Before the application can send funds or instruct the user to provide cash to a MoneyGram agent, the application should confirm with MoneyGram’s server that the transaction is ready to proceed which is signaled by the pending_user_transfer_start status.
You will need the following information to do so.
- The authentication token provided by MoneyGram
- The transaction’s ID provided by MoneyGram
- MoneyGram’s transaction’s endpoint (you don't need to worry about it if you are using the Wallet SDK)
This code uses a simple watching (polling) mechanism with no bail-out condition. The application’s code should be more robust.
- TypeScript
- Python
// We can keep the transaction "id" from the withdraw() call,
// authToken and assetCode from previous steps.
const { url, id: transactionId } = await anchor.sep24().withdraw({
  authToken,
  assetCode,
  // ...other params
});

// First, let's initialize a watcher object from the Wallet SDK.
let watcher = anchor.sep24().watcher();

// Then we have the option to watch for a particular transaction.
let { stop, refresh } = watcher.watchOneTransaction({
  authToken,
  assetCode,
  id: transactionId,
  onMessage: (transaction) => {
    if (transaction.status === "pending_user_transfer_start") {
      // begin transfer code
    }
  },
  onSuccess: (transaction) => {
    // transaction comes back as completed / refunded / expired
  },
  onError: (transaction) => {
    // runtime error, or the transaction comes back as
    // no_market / too_small / too_large / error
  },
});

// We also have the option to watch for ALL transactions of a particular asset.
let { stop, refresh } = watcher.watchAllTransactions({
  authToken,
  assetCode,
  onMessage: (transaction) => {
    if (transaction.status === "pending_user_transfer_start") {
      // begin transfer code
    }
  },
  onError: (transaction) => {
    // runtime error, or the transaction comes back as
    // no_market / too_small / too_large / error
  },
});

// While the Watcher class offers powerful tracking capabilities, sometimes
// it's required to just fetch a transaction (or transactions) once. The Anchor
// class allows you to fetch a transaction by ID, Stellar transaction ID, or
// external transaction ID like illustrated below.

// "id" is the actual Anchor transaction id, all transactions should have it.
const transaction = await anchor.sep24().getTransactionBy({
  authToken,
  id: transactionId,
});

// "stellarTransactionId" (aka "stellar_transaction_id" on the SEP spec)
// is the hash of the Stellar network transaction payment related to this
// Anchor transaction.
// The "stellarTransactionId" has a SHA256 hash format like the below:
// - "a35135d8ed4b29b66d821444f6760f8ca1e77bea1fb49541bebeb2c3d844364a"
// E.g. we'll only have this transaction id field AFTER the wallet sends funds
// to Anchor on the withdrawal flow or receives funds from Anchor on the
// deposit flow.
const transaction = await anchor.sep24().getTransactionBy({
  authToken,
  stellarTransactionId,
});

// "externalTransactionId" (aka "external_transaction_id" on the SEP spec)
// could refer to some ID of transaction on external network.
// E.g. for MoneyGram this is the "reference number" displayed to the user on
// the last step of MoneyGram's UI which the user should then use on a physical
// MoneyGram location to complete the cash out operation and pick-up the money.
const transaction = await anchor.sep24().getTransactionBy({
  authToken,
  externalTransactionId,
});

// It's also possible to fetch multiple transactions for an asset.
const transactions = await anchor.sep24().getTransactionsForAsset({
  authToken,
  assetCode,
});
import requests

response_body = poll_transaction_until_status(
    transaction_id,
    token=token,
    until_status="pending_user_transfer_start"
)

def poll_transaction_until_status(
    txid: str,
    token: str,
    until_status: str
) -> dict:
    first_iteration = True
    response_body = None
    status = None
    while status != until_status:
        if first_iteration:
            first_iteration = False
        else:
            time.sleep(1)
        query = f"{MGI_ACCESS_TRANSACTION_URL}?id={txid}"
        response = requests.get(
            query,
            headers={
                "Authorization": f"Bearer {token}"
            }
        )
        response_body = response.json()
        status = response_body["transaction"]["status"]
    return response_body
Sending Funds
Once MoneyGram is ready to receive funds, your application should extract the Stellar account, memo and amount to use in the payment transaction, construct a Stellar transaction, and submit it to the Stellar network. You’ll need:
- A copy of MoneyGram’s transaction object
- The application’s funds public & secret key
Code for submitting transactions to Stellar should be developed thoughtfully. The SDF has a documentation page dedicated to submitting transactions and handling errors gracefully. Here are a few things you need to keep in mind:
- Offer a high fee. Your fee should be as high as you would offer before deciding the transaction is no longer worth sending. Stellar will only charge you the minimum necessary to be included in the ledger -- you won't be charged the amount you offer unless everyone else is offering the same amount or greater. Otherwise, you’ll pay the smallest fee offered in the set of transactions included in the ledger.
- Set a maximum timebound on the transaction. This ensures that if your transaction is not included in a ledger before the set time, you can reconstruct the transaction with a higher offered fee and submit it again with better chances of inclusion.
- Resubmit the transaction when you get 504 status codes. 504 status codes are just telling you that your transaction is still pending -- not that it has been canceled or that your request was invalid. You should simply make the request again with the same transaction to get a final status (either included or expired).
Below is a sample Typescript code for submitting a payment ("transfer") transaction using the Wallet SDK. It uses timebounds and handles 504 status codes (inside submitTransaction), but it does not handle a transaction’s expiration.
Please note that the Python code is highly simplified. It does not use timebounds, handle 504 status codes or handle a transaction’s expiration.
- TypeScript
- Python
import { Wallet, IssuedAssetId } from "@stellar/typescript-wallet-sdk";
import { Horizon } from "@stellar/stellar-sdk";

const wallet = Wallet.TestNet();

// This creates a Stellar instance to manage the connection with Horizon.
const stellar = wallet.stellar();

// Let's make sure Anchor supports the token we want to withdraw.
const assetCode = "USDC";
const info = await anchor.getInfo();
const currency = info.currencies.find(({ code }) => code === assetCode);
if (!currency?.code || !currency?.issuer) {
  throw new Error(
    `Anchor does not support ${assetCode} asset or is not correctly configured on TOML file`,
  );
}

// This creates the Stellar asset object which we'll need while creating the
// transfer withdrawal transaction below.
const asset = new IssuedAssetId(currency.code, currency.issuer);

// This creates a transaction builder which we'll be using to assemble
// our transfer withdrawal transaction as shown below.
const txBuilder = await stellar.transaction({
  sourceAddress: FUNDS_STELLAR_KEYPAIR,
  baseFee: 10000, // this is 0.001 XLM
  timebounds: 180, // in seconds
});

// We can use the transaction object received on the onMessage callback from
// the watcher, or, we can also fetch the transaction object using either
// getTransactionBy or getTransactionsForAsset as illustrated in previous step.
onMessage: (transaction) => {
  if (transaction.status === "pending_user_transfer_start") {
    // Use the builder to assemble the transfer transaction. Behind the scenes
    // it extracts the Stellar account (withdraw_anchor_account), memo (withdraw_memo)
    // and amount (amount_in) to use in the Stellar payment transaction that will
    // be submitted to the Stellar network.
    const transferTransaction = txBuilder
      .transferWithdrawalTransaction(transaction, asset)
      .build();

    // Signs it with the source (funds) account key pair
    transferTransaction.sign(FUNDS_STELLAR_KEYPAIR);

    // Finally submits it to the stellar network. This stellar.submitTransaction()
    // function handles '504' status codes (timeout) by keep retrying it until
    // submission succeeds or we get a different error.
    try {
      const response = await stellar.submitTransaction(transferTransaction);
      console.log("Stellar-generated transaction ID: ", response.id);
    } catch (error) {
      /*
        In case it's not a 504 (timeout) error, the application could try some
        resolution strategy based on the error kind.

        On Stellar docs you can find a page dedicated to error handling:
        https://developers.stellar.org/docs/learn/encyclopedia/errors-and-debugging/error-handling

        And status/result codes:
        https://developers.stellar.org/docs/data/apis/horizon/api-reference/errors
      */

      // Let's illustrate here how we could handle an 'invalid sequence number' error.

      // We can access all possible result codes through Horizon's API.
      const sdkResultCodes = Horizon.HorizonApi.TransactionFailedResultCodes;

      // We can access error's response data to check for useful error details.
      const errorData = error.response?.data;
      /*
        Sample of errorData object returned by the Wallet SDK:
        {
          type: 'https://stellar.org/horizon-errors/transaction_failed',
          title: 'Transaction Failed',
          status: 400,
          detail: 'The transaction failed when submitted to the stellar network.
            The `extras.result_codes` field on this response contains further details.
            Descriptions of each code can be found at:
            https://developers.stellar.org/docs/data/apis/horizon/api-reference/errors/http-status-codes/horizon-specific/transaction-failed',
          extras: {
            envelope_xdr: 'AAAAAgAAAADBjF7n9gfByOwlnyaJH...k4BRagf/////////8AAAAAAAAAAA==',
            result_codes: { transaction: 'tx_bad_seq' },
            result_xdr: 'AAAAAAAAAGT////6AAAAAA=='
          }
        }
      */

      /*
        Example scenario: invalid sequence numbers.

        These errors typically occur when you have an outdated view of an account.
        This could be because multiple devices are using this account, you have
        concurrent submissions happening, or other reasons. The solution is relatively
        simple: retrieve the account details and try again with an updated sequence number.
      */
      if (
        errorData?.status == 400 &&
        errorData?.extras?.result_codes?.transaction ===
          sdkResultCodes.TX_BAD_SEQ
      ) {
        // Creating a new transaction builder means retrieving an updated sequence number.
        const txBuilder2 = await stellar.transaction({
          sourceAddress: FUNDS_STELLAR_KEYPAIR,
          baseFee: 10000,
          timebounds: 180,
        });

        // ...

        // Repeat all the steps until submitting the transaction again.

        // ...

        const response2 = await stellar.submitTransaction(transferTransaction);
        console.log(
          "Stellar-generated transaction ID on retry: ",
          response2.id,
        );

        // The application should take care to not resubmit the same transaction
        // blindly with an updated sequence number as it could result in more than
        // one payment being made when only one was intended.
      }
    }
  }
};
from stellar_sdk import (
    Server, TransactionBuilder, Network, Asset, IdMemo
)

submit_payment(
   destination=response_body["transaction"]["withdraw_anchor_account"],
   memo=response_body["transaction"]["withdraw_memo"],
   amount=response_body["transaction"]["amount_in"]
)

def submit_payment(destination: str, memo: str, amount: str):
   server = Server()
   account = server.load_account(FUNDS_STELLAR_KEYPAIR.public_key)
   transaction = TransactionBuilder(
       source_account=account,
       network_passphrase=Network.TESTNET_NETWORK_PASSPHRASE,
       base_fee=10000  # this is 0.001 XLM
   ).append_payment_op(
       destination=destination,
       asset=Asset(ASSET_CODE, ASSET_ISSUER),
       amount=amount,
   ).add_memo(
       IdMemo(int(memo))
   ).build()
   transaction.sign(FUNDS_STELLAR_KEYPAIR)
   response = server.submit_transaction(transaction)
   print(f"Stellar-generated transaction ID: {response['id']}")
Receiving Funds
Once MoneyGram is ready for the user to drop off cash at an MGI agent (in deposit or cash-in cases), the application’s server should begin monitoring its Stellar account for an inbound USDC payment sent by MoneyGram.
The application should have provided a memo for MoneyGram to use when it initiated the deposit. MoneyGram will attach this memo to the transaction used to send the payment to the application, and the application should use this check the memo of transactions involving it’s account to associate the payment back to the user and the specific transaction.
The best way to monitor payments made to an account is to stream events from Stellar’s payments endpoint. The use of streaming cursors can help ensure you never miss an event, even if your application’s streaming process goes down for a period of time.
Note that this code does not handle path payments or claimable balances, two slightly different forms of payment. At the time of writing, MoneyGram does not use either of these options, but you may want to add support for them in case they do in the future.
- TypeScript
- Python
// The Wallet SDK does not support payments streaming yet so let's build
// it using the underlying Horizon SDK
import { Horizon } from "@stellar/stellar-sdk";
import { getTransactionByMemo } from "./queries";

const streamPayments = (account: string, cursor: string) => {
  const server = new Horizon.Server("https://horizon-testnet.stellar.org");
  server
    .payments()
    .forAccount(account)
    .join("transactions")
    .cursor(cursor)
    .stream({
      onmessage: (payment) => {
        if (
          payment["type"] !== "payment" ||
          payment["from"] === account ||
          payment["asset_type"] === "native" ||
          payment["asset_code"] !== ASSET_CODE ||
          payment["asset_issuer"] !== ASSET_ISSUER
        ) {
          return;
        }

        const transaction = getTransactionByMemo(
          payment["transaction_attr"]["memo"],
          payment["transaction_attr"]["memo_type"],
        ); // this is your own DB query function

        if (!transaction) {
          return;
        }

        console.log(
          `Payment for deposit transaction ${transaction.id}`,
          `matched with Stellar transaction `,
          `${payment["transaction_attr"]["id"]}`,
        );
      },
      onerror: (error) => {
        // handle error
      },
    });
};
from stellar_sdk import Server
from .queries import get_transaction_by_memo

def stream_payments(account: str, cursor: str):
    s = Server()
    payments = s.payments().for_account(account).join("transactions")
    for payment in payments.cursor(cursor).stream():
        if (
            payment["type"] != "payment"
            or payment["from"] == account
            or payment["asset_type"] == "native"
            or payment["asset_code"] != ASSET_CODE
            or payment["asset_issuer"] != ASSET_ISSUER
        ):
            continue
        transaction = get_transaction_by_memo(
            payment["transaction"]["memo"],
            payment["transaction"]["memo_type"]
        )  # DB query
        if not transaction:
            continue
        print(
            f"Payment for deposit transaction {transaction.id} "
            "matched with Stellar transaction "
            f"{payment['transaction']['id']}"
        )
Fetch the Reference Number
For deposit or cash-in transactions, MoneyGram does not provide reference numbers. All the user needs to do is drop off cash at the agent location chosen in the MoneyGram UI earlier in the flow, and the application should complete the transaction when a matching payment is detected on Stellar.
For withdrawal or cash-out transactions, MoneyGram provides a reference number in their UI and API once MoneyGram detects the application’s payment of USDC on Stellar. Users should be able to use the application’s client interface to view the reference number directly or find the MoneyGram transaction details page and view it there.
Note that MoneyGram’s transaction details page is protected with a JWT token in the url that expires relatively quickly after being fetched. This means applications must fetch the URL at the time the user requests the page, potentially requiring re-authentication via SEP-10.
- TypeScript
- Python
// Watcher's onMessage callback, see previous steps for more info on this
onMessage: (transaction) => {
  if (transaction.status === "pending_user_transfer_complete") {
    console.log(
      `Transaction reference number ${transaction.external_transaction_id}`,
      `also viewable at ${transaction.more_info_url}`,
    );
  }
};
from .api import poll_transction_until_status

response_body = poll_transaction_until_status(
    transaction_id,
    "pending_user_transfer_complete"
)
tx_dict = response_body["transaction"]
print(
    f"Transaction reference number {tx_dict['external_transaction_id']} "
    f"also viewable at {tx_dict['more_info_url']}"
)